

"Building a Strong Foundation: Week 4 Back Exercises for Beginners"
Introduction
Welcome to Week 4 of your back exercises journey! By now, you've laid a solid foundation, and it's time to elevate your Back exercises routine. This week focuses on refining your form and gradually intensifying the exercises.
Begin with a dynamic warm-up to activate those back muscles and enhance flexibility. Incorporate classic movements like lat pulldowns and bent-over rows, ensuring a controlled motion to maximize muscle engagement. Don't forget to emphasize proper posture—keeping that spine aligned is key!
Introduce new elements, such as resistance bands or light dumbbells, to add resistance without compromising your form. Target different areas of your back with exercises like Straight-arm Rope pulldown and Seated Cable row. These variations will not only challenge your muscles but also contribute to a well-rounded, sculpted back.
As you progress through Week 4, listen to your body, gradually increasing intensity, and revel in the empowering journey of transforming your back strength. Get ready to witness the impressive results of your dedication and perseverance!
Week 4 Goals
It's time to boost the ante and take on more obstacles as you begin the fourth week of your back-focused exercise program. You've already laid a foundation, so Week 4 will focus on honing and fortifying your back muscles.
1.Progressive Resistance:
- As you perform your workouts, gradually increase the weight or resistance. This moderate pace promotes muscular development and guarantees ongoing improvement.
2.Variety in Movements:
- Increase your range of motion when performing back exercises. Target various back muscular areas using a combination of pull-ups, rows, and lat pulldowns to promote balanced development.
3.Focus on Form:
- Maintaining proper form is essential for avoiding injuries and enhancing the efficiency of your workouts. Make sure your back muscles are doing the effort rather than momentum by focusing on controlled motions.
4.Increase Repetitions:
- Increase the amount of repetitions in each set to push yourself beyond your comfort zone. In order to gradually increase endurance, aim for a difficult-yet-manageable range.
5.Incorporate Isometric Holds:
- Isometric holds should be incorporated into your practice to improve muscular engagement. At the height of each movement, pause, feeling your back muscles clench, and then slowly let go.
List Of Back Exercises :
1. Lat Pulldown

The Lat Pulldown, a quintessential back exercise, is a gym favorite for sculpting a powerful and well-defined upper body. This compound movement primarily targets the latissimus dorsi, the broad muscles of the back, promoting strength and aesthetics. Using a cable machine, you sit and pull a bar down to chest level, engaging your back muscles as you do.
The key is a controlled motion, focusing on the squeeze as you lower the bar and the stretch as you release. It's beginner-friendly, yet versatile for all fitness levels, allowing you to adjust weights for gradual progression. Beyond aesthetics, the Lat Pulldown enhances posture and supports overall upper body strength. So, if you're looking to spread your wings and build a robust back, the Lat Pulldown is your go-to exercise.
Performing a lat pulldown: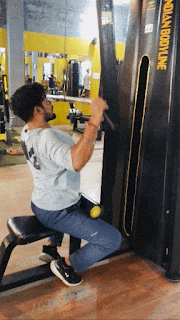

1.Set Up:
- By adjusting the seat height of the lat pulldown machine, make sure your feet are flat on the ground.
- Take a slightly wider than shoulder-width apart, overhand grip on the bar.
2.Body Position:
- When you sit down, tuck your thighs under the thigh protectors.
- You can keep your spine in a neutral position by keeping your shoulders back and your chest up.
- If necessary, tighten your knees and adjust the knee protectors.
3.Execution:
- Taking a breath, tightening your lats, and pulling the bar towards your chest.
- When pulling through, focus on forcing your elbows back and down.
- Exhale and lower the bar gradually as you return to the starting position.
4.Motion Sensitivity:
- Try to drop the bar to the upper chest while maintaining a motionless torso.
- Do not stoop or lean back too far.
Sets and Reps:
For beginners, it's advisable to start with a moderate weight and focus on mastering the form before progressing to heavier loads. Here's a basic guideline:
Sets:
- 3-4 sets
Reps:
- 10-12 reps per set
As you become more proficient, you can experiment with different rep ranges, such as incorporating lower reps with heavier weights for strength, or higher reps for muscular endurance.
Tips for Beginners:
1.Light Weights First:
- Master the form with lighter weights before attempting heavier loads.
2.Focus on Form:
- Prioritize proper form over lifting heavy.
- Ensure a controlled, smooth movement throughout.
3.Warm-Up:
- Warm up your shoulders and back with light cardio and dynamic stretches.
4.Mind-Muscle Connection:
- Concentrate on feeling the muscles contract and stretch with each rep.
5.Variations:
- Experiment with different grips to target various back muscles.
6.Consult a Trainer:
- If possible, seek guidance from a fitness professional to ensure correct form.
2.Bent Over Row

The bent-over row is a powerful Back Exercises that helps you build a lean, muscular upper body. You perform this exercise while keeping your knees slightly bent and using an overhand grip to hinge at the hips. Your lats contract as you draw the bar towards your chest, helping to build back stability and muscle.
This exercise works the rhomboids, traps, and rear deltoids in addition to the latissimus dorsi. Beyond aesthetics, the Bent Over Row enhances functional strength for daily activities and improves posture. To optimize the exercise's benefits while lowering the chance of injury, keep your spine neutral and move slowly throughout.
How to Do a Bent Over Row

1.Starting Place:
- Standing with your feet shoulder-width apart, grasp an overhand grip on a barbell.
- Keep your core tight, your chest up, and your back straight.
2.The hips should bend:
- Keep your back flat and nearly parallel to the ground as you hinge at your hips.
- Let your arms dangle straight down from your shoulders.
3.Pull and Grip:
- Hands somewhat wider than shoulder width apart should be used to hold the barbell.
- Pull the barbell towards your lower chest while retracting your shoulder blades to begin the exercise.
- As you move, keep your elbows tight to your torso.
4.Lowering Under Control
- In order to maintain appropriate form, lower the barbell back to the starting position slowly.
Sets and Repetitions:
- It is advised that beginners begin with a moderate weight and concentrate on perfecting the form. 3 sets of 8–12 repetitions are your goal. According to your fitness objectives, you can gradually increase the weight and change the rep range as you advance. Work in the range of 4-6 repetitions with heavier weights to develop strength and muscle.
Tips for Beginners:
1.Start with Light Weights:
- Focus on perfecting your form before increasing the weight.
- This helps prevent injury and ensures you're effectively targeting the right muscles.
2.Gradual Progression:
- Increase the weight gradually to challenge your muscles without compromising form.
- Aim for a weight that allows you to complete each set with proper technique.
3.Mind-Muscle Connection:
- Concentrate on feeling the muscles in your back working throughout the movement.
- Visualize squeezing your shoulder blades together to maximize engagement.
4.Warm-Up Thoroughly:
- Prioritize a dynamic warm-up to prepare your back, shoulders, and core for the demands of the exercise.
- Include light cardio, arm circles, and shoulder mobility exercises.
5.Utilize Grips:
- Experiment with different grips, such as overhand and underhand, to target various parts of the back.
- This adds variety and ensures balanced muscle development.
3.Single arm dumbbell row

The single-arm dumbbell row stands as a stalwart among back exercises, sculpting a robust and defined posterior chain. This exercise hones in on the lats, rhomboids, and traps, fostering both strength and symmetry. Executed with a dumbbell in hand, the movement engages the core for stability while isolating each side of the back independently. As the spine remains neutral, the row initiates from a full extension, gracefully pulling the weight towards the hip.
The controlled contraction not only targets muscle growth but enhances muscular endurance. With its versatility and accessibility, the single-arm dumbbell row serves novices and seasoned gym enthusiasts alike, contributing to a well-rounded back Exercises and reinforcing a foundation for overall strength and posture.
How to do:

Step 1:
- Prepare yourself for the Single Arm Dumbbell Row
- Set a suitable-weight dumbbell on the ground next to a flat bench.
- As you sit on the bench, place one knee and one hand against the seat and straighten your back so that it is parallel to the ground.
- Your body can be supported on the bench by the non-working arm, which can also provide stability by gripping the bench.
Step 2: Hold the dumbbell firmly
- Reach down and take the dumbbell in a neutral hold with your palm facing in with your free hand.
- Keep your elbows slightly bent, your chest up, and your back straight.
Step 3: Initiate the Movement
- Pull the weight towards your hip in a controlled motion, keeping your elbow close to your body.
- Focus on pressing your shoulder blades together at the exercise's peak to appropriately engage your lats.
Step 4: Lower the Dumbbell
- Slowly drop the dumbbell back to its starting position to provide a full range of motion.
- Slow weight loss is preferable because quick weight loss might strain your muscles and produce form problems.
Total Sets and Reps:
For beginners, start with 3 sets of 10-12 reps per arm. As you progress, you can increase the weight and adjust the sets and reps accordingly. Aim for a weight that challenges you but allows you to maintain proper form.
Tips for Beginners:
1.Start with a Light Weight:
- Start with a weight that pushes you but still enables you to keep good form.
- Prior to gradually raising the load, concentrate on perfecting the movement.
2.Keep a Good Posture:
- To properly target the back muscles, keep your chest raised and your back straight throughout the exercise.
- Avoid excessively rounded shoulders or back arches.
3.Movement Under Control:
- Control the exercise's lifting and lowering phases. Avoid lifting the weight with momentum.
4.Naked Spine:
- Make sure your neck is neutral and in line with your spine. Try not to gaze up or down too much.
5.Warm-Up:
- Give a full warm-up first priority to get your muscles ready for the challenging workout. Include brisk aerobic and vigorous stretching.
6.Breathing Exercises:
- As you lower the weight, inhale; as you lift it, exhale. This breathing technique aids with core stabilization.
4.Seated cable rows

The cornerstone of back exercises for building a strong, developed upper body is the seated cable row. This exercise develops a symmetrical and strong back by working the latissimus dorsi, rhomboids, and traps. The regulated draw of the wire towards your torso while you sit facing a cable machine and maintain a straight posture works many muscle groups at once.
Customization is possible thanks to the adjustable cable height, which can accommodate different body types and fitness levels. In addition to improving strength, this compound activity also improves posture and muscular coordination. Any exercise regimen can benefit from include seated cable rows, which provide a dynamic and efficient way to develop a tough, V-shaped back that demonstrates your dedication to fitness.
Seated Cable Rows: How to Do Them:

1. Set Up
- With your feet flat on the platform and your knees slightly bent, take a seat on the cable rowing machine.
- Select a suitable handle attachment and adjust the seat height.
2.Grip:
- Hands somewhat wider than shoulder width apart, overhand grip the handle.
- Throughout the exercise, maintain a tight hold.
3.Posture:
- Maintain a straight back, an uplifted chest, and relaxed shoulders.
- Using your back muscles, pull your shoulder blades back and downward.
4.Movement:
- Pulling the handles toward your torso will start the motion.
- At the most intense point of the contraction, tense your back muscles.
- As you stretch your arms back to the beginning position, control the descent.
5.Breathing:
- As you raise your arms, take a breath.
- Pull the handles closer to your torso while exhaling.
Tips for Beginners:
1.Start with a Light Weight:
- Begin with a weight that allows you to maintain proper form.
- Focus on mastering the movement before increasing the load.
2.Maintain Proper Form:
- Pay close attention to your posture throughout the exercise.
- Avoid using momentum to lift the weight; instead, rely on the strength of your back muscles.
3.Full Range of Motion:
- Ensure that you pull the handles all the way to your torso for a full contraction of the back muscles.
- Avoid shortening the range of motion, as this can limit the effectiveness of the exercise.
4.Mind-Body Relationship:
- With each repeat, pay close attention to how your back muscles are contracting.
- As you complete the exercise, imagine your back muscles working.
5.Increase Intensity Gradually:
- As your strength increases, gradually increase the weight.
- To avoid damage, avoid increasing your weight quickly.
5.Straight-arm Rope pulldown

A dynamic back exercises that targets the lats and builds a lean and powerful upper body is the straight-arm rope pulldown. This workout strengthens the latissimus dorsi muscles' engagement using a cable machine and a rope connection. You pull the rope towards your thighs while seated and facing the cable machine, extending your arms while keeping your elbows slightly bent.
This exercise isolates the lats, improving strength and muscle definition. The careful, controlled action also works the trapezius and rhomboid muscles, resulting in a more fully developed back. Straight-arm Rope Pulldowns are a great exercise to include in your program because they improve posture and upper body stability in addition to helping you develop a V-shaped physique.
Straight-Arm Rope Pulldown Technique:

1.Set Up:
- A cable machine's high pulley should have a rope handle attached to it.
- Standing with your feet shoulder-width apart, face the machine.
- Keep your arms outstretched and grasp the rope with an overhand grip.
2.Body Alignment:
- Throughout the workout, keep your elbows slightly bent.
- For stability, keep your core engaged, shoulders back, and chest up.
- To reduce needless stress on your lower back, stand tall with a neutral spine.
3.Execution:
- Pulling the rope downward while maintaining your arms straight will start the exercise.
- To bring your hands up to your thighs, concentrate on tightening your lats.
- For maximal involvement, contract your back muscles at the bottom of the exercise.
- Return to the starting location slowly and safely.
Total Sets and Reps:
Sets:
- Aim for 3 to 4 sets.
Reps:
- Start with 10-12 reps per set.
Tips for Beginners:
Start with Light Resistance:
- Start with a smaller weight if you've never done this exercise before to guarantee perfect technique and avoid overworking your muscles.
Focus on Control:
- Keep your motions under control the entire exercise. The effectiveness of the workout may be lowered if you use momentum to pull the weight.
Mind-Muscle Connection:
- Pay close attention to how your lats contract with each repetition. The exercise is more effective when there is a strong link between the mind and the muscles.
Gently raise Resistance:
- As you get more accustomed to the exercise, gently raise the resistance to keep your muscles guessing.
Warm-up:
- A good warm-up should come first before beginning your Straight-Arm Rope Pulldown program.
- This protects your muscles from harm and gets them ready for the forthcoming workout.
Consult a Fitness Professional:
- To guarantee a safe and efficient workout, think about asking advice from a fitness professional if you're unsure of your form or have any pre-existing issues.
Motivational Element:
Success Story:

Meet Sarah, a beginners who made the decision to put the health of her back first. She began with basic workouts like bodyweight rows and added resistance bands gradually. She added more difficult exercises like bent-over rows and lat pulldowns as she advanced. She saw a noticeable improvement in her posture over time, and she also gained a strong, well-defined back. Sarah's accomplishment serves as a testament to the positive effects of perseverance and commitment.
Motivational Quotes:
- Your back is the backbone of your strength. Strengthen it, and you'll find the strength to conquer any challenge.
- Every row, every pull, every effort counts. Small steps lead to mighty transformations."
- Don't focus on the mountain ahead; focus on the step you're taking right now. Progress is progress, no matter how small.
- Your back is not just about appearance; it's about resilience. A strong back supports you in more ways than one.
- Embrace the discomfort of growth. In every lift, in every stretch, you're becoming a stronger version of yourself.
Common Mistakes to Avoid for Beginners

The development of a powerful, defined back is crucial for both posture and general fitness. However, many people inadvertently make blunders when working out their backs that can impede progress and cause injuries. Here are some typical problems to avoid:
1.Poor Form:
- Sacrificing form for high weights is one of the most serious mistakes. In addition to decreasing the exercise's effectiveness, improper form also raises the possibility of injury.
- Observe good posture and use slow, controlled motions to target the appropriate muscles.
2.Skipping a good Warm-Up:
- Skipping a good warm-up might cause back pain. Warm up your back for the forthcoming workout by doing some mild cardio and dynamic stretches to promote blood flow and flexibility.
3.Overreliance on Machines:
- Using only machines restricts motion and does not activate stabilizing muscles. For a more complete workout, mix in bodyweight and free weight movements.
4.Ignoring the Core:
- The core and the back are entwined. Your back health may be impacted by an imbalance caused by neglecting core activities.
- To strengthen your core, do exercises like Russian twists and planks.
5.Too Much Too Soon:
- The trick is to advance gradually. Strains and injuries can result from attempting to lift weights that are too heavy before you have mastered the fundamentals.
- Start out light and concentrate on good form.
6.Lack of Variety:
- When you keep doing the same exercises, your progress may stall.
- To avoid getting tired and to target different muscles, add variation to your back exercises regimen.
FAQ's
1.What are the best back exercises for beginners?
- Start with bodyweight exercises like inverted rows and progress to lat pulldowns and dumbbell rows. These target key muscle groups while allowing for gradual strength development.
2.How often should beginners train their back?
- Aim for 2-3 sessions per week, allowing a day of rest between workouts. Consistency is key for building strength and avoiding overtraining.
3.Should I feel soreness after a back exercises ?
- Mild soreness is normal, indicating muscle engagement. However, severe pain may suggest poor form. Focus on proper technique to prevent injuries.
4.Can a Beginners use a machine for back exercises?
- For Beginners, lat pulldown machines are a wonderful choice since they provide stability and controlled actions. Incorporate free weights gradually as your strength grows.
5.How can I work out my back without hurting myself?
- When exercising, maintain your spine neutral and begin with less weights. Prioritize proper form above high weights. If you experience chronic pain, speak with a medical professional or a trainer.
Conclusion
In Week 4 of your back exercises journey, you've not just strengthened muscles but built resilience. The progressive challenges have sculpted your back, enhancing posture and overall well-being. Consistency is now ingrained, forming a foundation for a healthier lifestyle. As you conclude this week, reflect on the journey—every stretch, lift, and moment of perseverance. It's not just physical; it's a mental triumph. Remember, fitness is a lifelong expedition, and you've laid down sturdy tracks. Celebrate the progress, embrace the lessons, and step forward with newfound strength into the next phase of your wellness adventure.
Post a Comment
0Comments