

"Week 2: Building a Stronger Back - Essential Back Exercises for Gym Beginners."
Any comprehensive fitness program must include back exercises because they work the muscles that support the spine and develop and stabilize the entire upper body. In addition to improving posture and easing common discomfort brought on by sedentary lifestyles, a strong back also helps to prevent injuries.Effective back exercises can offer a lot of physical and even psychological advantages, whether you're an athlete looking to increase performance, a fitness fanatic seeking to contour your body, or you're just looking for relaxation from daily demands.
In this Article
- The Importance of Week 2 of the Back Exercises
- Lat-Pulldown
- Dumbbell Rows
- Bodyweight Rows
- Deadlifts
- Back Extension
- Pull-Up
- Benefits / Advantage
- Progression Tips
- Common Mistakes to Avoid
- Nutrition and Rest
- Conclusion
The Importance of Week 2 of the Back Exercises
It's simple to become enthused about rapid results and concentrate just on the here and now when starting a fitness journey. However, it would be a mistake to undervalue the significance of Week 2 in terms of back exercises This step, which is sometimes skipped, is essential for long-term success and general back health.1.Adaptation:
- During the first week, your muscles are put under stress and new movements. Your body has two weeks to adapt, which lowers your chance of injury and muscular strain. Your nervous system starts to hone the precise motor abilities needed for good form.
2.Building Consistency:
- It takes time to establish a routine. Your exercise routine becomes second nature by Week 2, which increases the likelihood that you'll continue it. The secret to getting long-lasting results is consistency.
3.Progress tracking:
- The second week gives you the chance to evaluate your development. Are you exerting more effort, doing more repetitions, or feeling less pain? Monitoring these developments inspires you and you in setting practical goals.
4.Preventing Plateaus:
- In Week 2, you begin putting additional demands on your muscles. This avoids the dreaded workout plateau, in which your body stops progressing because it has adapted to the exercise.
5.Injury Prevention:
- As your body adjusts to the workouts, your form gets better and your chance of injury goes down. For back exercises to be effective, proper form is crucial.
1. Lat-Pulldown
Having a strong and powerful back is typical for shaping a well-balanced body in big proportion. The lat pulldown is one of the best workouts for the latissimus dorsi, or "lats," muscle. People of all fitness levels can benefit greatly from this adaptable equipment. The benefits of using lat pulldowns in your training regimen, detailed instructions on how to operate a lat pulldown machine, and a focus on safety considerations are all covered in this article.
The advantages of lat pulldowns
1.Lat development:
- The main advantage of lat pulldowns is that they are an efficient way to target the latissimus dorsi muscles. A V-shaped torso can be made by developing well-defined lats, which can result in a more aesthetically pleasing body.
2.Strength and Muscle Growth:
- The main advantage of lat pulldowns is that they are an efficient way to target the latissimus dorsi muscles. A V-shaped torso can be made by developing well-defined lats, which can result in a more aesthetically pleasing body.
- Lat pulldowns are a great compound workout that work the biceps, rear deltoids, and trapezius, among other muscle groups. Strength gains and muscular growth result from this.
3.Improved Posture:
- You may stand up straighter by strengthening the muscles in your upper back, which will lessen the negative effects of lengthy periods of sitting and slouching.
4.Variety and Versatility:
- You may conduct a variety of exercises with the accessories that come with lat pulldown machines. These variations could provide variety and a workout for various back regions.
5.Beginner-Friendly :
- Lat pulldowns offer a controlled and directed movement that lowers the chance of injury as opposed to free weights.
Using the Lat Pulldown Machine: Step-by-Step Instructions
Before you start using the lat pulldown machine, make sure you're familiar with its setup and adjustments. Most lat pulldown machines have an adjustable seat, thigh pads, and a pulldown bar with various grips. Here's how to use it correctly:
Adjust the machine in Step 1
- Start by assuming a sitting position on the machine with your back firmly placed against the backrest, your knees bent at a 90-degree angle, and your feet level on the floor.
- In order to keep your legs in position, adjust the thigh pads. They shouldn't pinch or hurt your thighs while they lie there.
- Based on your objectives, pick the suitable grip attachment. The lats are highlighted by a broad hold, whilst the biceps and upper back are highlighted by a close grip.
Step 2:Grab the bar
- Your preferred hand posture should be somewhat broader than shoulder-width apart when you reach up and grasp the bar.
3 Step:
- Execute the Movement
- Breathe in and tighten your abdominal muscles.
- You should exhale as you steadily lower the bar to your chest. Keep your elbows pointed downward, shoulders down, and chest high.
- When the bar is close to your chest, pause for a second to feel your lats constrict.
- As you slowly stretch your arms to bring the bar back to its initial position, take a breath. Don't let the weight stack to slam down.
Reps and Sets
- Your fitness objectives will determine the amount of repetitions and sets you do:
- Strength and Mass: Use heavier weights for 3-5 sets of 6–10 repetitions.
- Perform 3–4 sets of 12–15 repetitions with modest weights for endurance and toning.
- Muscular Endurance: Use lesser weights and aim for 2-3 sets of 15-20 reps.
Safety Guidelines
1.Warm-up:
- Before beginning any activity, give your muscles and joints a thorough warm-up.
2.Proper Form:
- To avoid accidents and promote efficient muscle activation, keep your back straight during the whole workout.
3.Start with a Light Weight:
- To learn good form and prevent overstretching your muscles, start with a light weight if you are new to lat pulldowns.
4.Controlled Movements:
- To avoid jerking or swinging while executing the exercise, move slowly and deliberately.
5.Consult a Trainer:
- If you require assistance utilizing the equipment or if you are experiencing any health problems, speak with a trainer or fitness expert.
2.Dumbbell Rows

Not only does having a strong and well-developed back look good, but it is also essential for general strength and posture. You can accomplish so by using the lat pulldown machine and dumbbell rows, two very powerful workouts. The advantages of dumbbell rows, how to utilize a lat pulldown machine, and safety precautions to follow while performing these exercises are all covered in this article.
Dumbbell Row Advantages
1.Targeted Back Development:
- The huge muscles in your back that give it a V-shape, the latissimus dorsi, are the main target of dumbbell rows.
2.Improved Posture:
- Strengthening your back muscles might help with posture issues brought on by prolonged hours of sitting.
3.Strength Balance:
- Dumbbell rows assist in balancing out your upper body strength, which is crucial for avoiding injuries.
4.Functional Strength:
- Maintaining spinal stability and lifting objects are only two daily tasks that require a strong back.
How to Perform Dumbbell Rows:
Follow these step-by-step instructions to perform dumbbell rows correctly:Equipment:
You'll need a pair of dumbbells and a flat bench.
Technique:
1.Set Up:
- Stand beside the bench with a dumbbell in each hand. Place one knee and one hand on the bench while keeping your back straight and parallel to the ground. Your free hand should be holding a dumbbell with your arm extended downward.
2.Engage Your Core:
- To maintain a secure stance, make sure your core is engaged and your back is flat.
3.Rowing Motion:
- Exhale as you raise the dumbbell toward your hip in a rowing motion, maintaining your elbow close to your body the entire time. As the movement comes to a close, tighten your back muscles.
4.Lower the Weight:
- As you fully extend your arm and return the weight back to the beginning position, take a deep breath.
5.Repetition:
- Complete the required number of repetitions on one side before moving on to the other.
Reps and Sets:
For novices, aim for three sets of 8–10 repetitions on each side. Increase the weight as you advance and lower the reps to three sets of 6–8 for a more intense workout. Always start with a weight that challenges you while letting you maintain flawless form.Safety Guidelines:
1.Warm-Up:
- Always begin an exercise session with a thorough warm-up in order to prepare your muscles and joints.
2.Maintain Proper Form:
- Keep your spine straight and avoid slouching by using appropriate form. Keep your core active during the move to protect your lower back.
3.Choose an Appropriate Weight:
- Select an appropriate weight for your level of fitness. Increase the weight of the workout gradually as you gain stronger.
4.Control the Movement:
- To lift the dumbbell, don't use momentum; instead, use control. Focus on a steady, progressive movement for the best muscular involvement.
5.Breathe Properly:
- Breathe properly by exhaling as you raise the dumbbell and inhaling as you lower it.
3.Bodyweight Rows: 
A basic and adaptable exercise in the world of bodyweight training are rows. The back, biceps, and shoulders are the primary muscle groups targeted by this straightforward yet powerful exercise. It also engages the core and strengthens the entire upper body. Bodyweight rows entail holding oneself horizontally beneath a bar or other firm surface and pushing the body upward. 
They are also known as inverted rows or Australian pull-ups. Bodyweight rows are a great complement to any exercise regimen for increasing muscular growth and functional strength because they require little to no equipment and have flexible difficulty levels for fitness enthusiasts of all levels.
Bodyweight Rows' advantages include:
The latissimus dorsi, rhomboids, and lower trapezius muscles are primarily worked out by bodyweight rows, often referred to as inverted rows or Australian pull-ups. Here are a few advantages they provide:1.Strengthening of the Upper Body:
- Bodyweight rows work a variety of upper body muscles, enhancing back, shoulder, and arm strength.
2.Improved Posture:
- By regularly strengthening the muscles that draw the shoulders back and down, bodyweight rows help improve bad posture.
3.Versatility:
- By changing the exercise's angle or amount of difficulty, these rows can be modified for people of different fitness levels.
4.Minimal Equipment:
- Bodyweight rows can be performed with little to no equipment, making them accessible to the majority of people, including those exercising.
How to Perform Bodyweight Rows:
- To efficiently perform bodyweight rows, adhere to the steps below:
Equipment Needed:
- A horizontal bar or suspension trainer (like TRX) is required equipment.
Safety Guidelines:

1.Warm-Up:
- Start with a warm-up to get your muscles and joints ready. Injuries can be avoided with some modest aerobic and dynamic stretching.
2.Proper Form:
- Maintain a straight body during the entire workout, from your head to your toes. Don't let your hips sag or let your back arch.
3.Controlled Movement:
- Working the rows slowly and deliberately is controlled movement. During the exercise's apex, focus on fusing your shoulder blades together.
4.Breathing:
- When lifting your chest toward the bar or handles, exhale. When lowering yourself, inhale.
Steps:
- 1.Set up your equipment: If using a horizontal bar, make sure it's secure. If using a suspension trainer, adjust the handles to chest height.
- 2.Stand facing the bar or handles, arms extended, and grab them with an overhand grip (palms facing down).
- 3.Walk your feet forward, leaning back while keeping your body straight.
- 4.Begin the row by pulling your chest toward the bar or handles, bending your elbows and squeezing your shoulder blades together.
- 5.Lower your body back down to the starting position with control.
Sets and Reps
- Depending on your fitness level and goals, different numbers of reps and sets may be used.
Here is a general rule of thumb:
- Beginners should begin with 2-3 sets of 8–10 repetitions, with plenty of rest in between.
Intermediate:
- Aim for three to four sets of ten to twelve repetitions with less time between sets.
Advanced:
- Push yourself with 4-5 sets of 12–15 repetitions, with little break in between.
4.Deadlifts: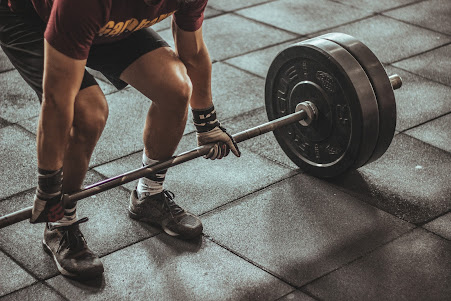
The deadlift, a cornerstone compound exercise in strength training, is an undisputed example of strength and fortitude. It includes using several muscle groups at once to raise a heavy barbell or weight from the floor to a standing position. 
Along with improving core, back, and leg strength, this exercise also improves posture and grip power.Higher metabolism, higher bone density, and improved functional strength for daily activities are just a few advantages of deadlifts. They are a cornerstone of powerlifting and crucial to developing a well-balanced physique.
However, in order to avoid damage, appropriate form and technique are essential, thus newcomers should seek advice from knowledgeable trainers. Including deadlifts in your exercise regimen can help you become stronger, more self-assured, and more healthy overall.
Benefits of Deadlifts
A common compound exercise that works several muscular groups at once is the deadlift. When done properly, deadlifts have a number of advantages that make them a mainstay of strength-training regimens:1.Full-Body Exercise:
- Deadlifts work out the hamstrings, glutes, lower back, traps, and forearms, among other important muscle groups. This complex action works the upper and lower bodies equally, giving you a full-body workout.
2.Gains in strength:
- Deadlifts are the best exercises for enhancing overall strength. You put your entire body through a strengthening test when you lift heavy objects off the ground.
3.Muscular Growth:
- Deadlifts, a complex exercise, promote muscular growth in a variety of muscle groups, resulting in a more aesthetically pleasing body.
4.Better Posture:
- Deadlifts enhance posture and minimize the risk of back injury by requiring good form and core engagement.
5.Functional Strength:
- The strength developed through deadlifts translates to everyday duties, easing burdens and lowering injury risks.
How to Perform Deadlifts
To prevent damage, it's imperative to perfect good form before beginning a deadlift. Observe these detailed directions:
1.Setup:
- a. Place the barbell over the center of your feet while standing with your feet shoulder-width apart.
- b. To approach the barbell, lower yourself by bending at the hips and knees.
- c. Use an overhand or mixed grip (one hand overhand, one hand underhand) to hold the bar with both hands, somewhat wider than shoulder width apart.
- d. Keep your shoulders back, your chest high, and your back straight.
2.The Lift:
- a. Push through your heels, engaging your glutes, hamstrings, and back muscles.
- b. Lift the barbell by extending your hips and standing up straight.
- c. Keep the barbell close to your body as you lift it.
3.Lockout:
- a. Once you're standing upright, push your hips forward and squeeze your glutes to reach the lockout position.
- b. Your shoulders should be pulled back, and your back should be straight.
4.Lowering:
- a. To lower the bar, hinge at your hips and bend your knees, keeping the bar close to your body.
- b. Place the barbell back on the ground with control.
Reps and Sets
- Depending on your fitness objectives, you should execute a certain amount of reps and sets:
- Strength: For three to five sets, do fewer reps (1 to 5) with heavier weights. Rest for 2 to 5 minutes in between sets.
For hypertrophy (muscle growth):
- Aim for 6–12 reps with light weights over the course of three–four sets. Between sets, take 1-2 minutes to relax.
Endurance:
- Use lesser weights and execute 12–20 reps for three–four sets to build endurance. Between sets, take a 30- to 1-minute break.
Safety Guidelines
- To ensure your safety while performing deadlifts:
1.Warm-Up:
- Always warm up before lifting heavy weights to prevent injuries. Include dynamic stretches and mobility exercises.
2.Proper Form:
- Maintain proper form throughout the lift. Focus on keeping your back straight, chest up, and core engaged.
3.Start Light:
- If you're new to deadlifts, start with lighter weights to master the technique before progressing to heavier loads.
4.Spotter:
- If you're lifting extremely heavy weights, have a spotter present to assist if needed.
5.Avoid Overtraining:
- Allow sufficient rest and recovery between deadlift sessions to prevent overtraining and injury.
5.Back Extension
Back extensions are a crucial exercise to improve posture generally, promote spinal health, and develop the lower back muscles. This focused exercise involves stretching the spine against resistance using bodyweight exercises or the use of specialized equipment. Back extensions aid to maintain a strong core by strengthening the back as well as the erector spinae, glutes, and hamstrings. Whether you're an athlete looking to improve performance, someone looking for relief from back pain, or simply someone looking to maintain a strong and balanced physique, understanding and incorporating back extension exercises into your fitness routine is essential for achieving a resilient and pain-free back.
Benefits of Back Extensions
Benefits of Back Extensions

1.Lower Back Strengthening:
- Back extensions typically work the erector spinae and other lower back muscles. For maintaining proper posture and avoiding lower back pain, a strong lower back is essential.
2.Enhancing Posture:
- Back extensions can assist you in maintaining good posture throughout the day by strengthening the muscles that keep your spine upright.
3.Enhancing Core Stability:
- These exercises help to improve stability and balance by training the core muscles.
4.Injury Prevention:
- People with strong lower backs are more likely to avoid injuries when engaging in sports or other activities that involve lifting or twisting actions.
5.Improved Athletic Performance:
- Many athletes incorporate back extensions into their training regimens to enhance their performance in a range of sports, including weightlifting, gymnastics, and track & field.
How to do back extensions
- Equipment is needed, such as a Roman chair or back extension bench.
Step-by-Step Instructions
1.Configuration:
- Adjust the back extension bench or Roman chair to your body's size and comfort. You should stand with your hips at the pad's edge with your feet tucked beneath the footpads.
2.Starting Position:
- Cross your arms over your chest or place your hands behind your head with your elbows pointed out to the sides. You can maintain a neutral spine by keeping your head in line with your spine.
3.Engage Your Core:
- Before lifting your upper body, engage your core muscles. This will help protect your lower back during the movement.
4.Lift Your Upper Body:
- Slowly raise your upper body by extending your lower back. Keep your movement controlled and avoid jerking or using momentum.
5.Full Extension:
- Continue lifting until your torso is in line with your legs or slightly above. You should feel a strong contraction in your lower back muscles.
6.Lowering Phase:
- Lower your upper body back down to the starting position in a controlled manner, maintaining good form throughout.
Safety Guidelines
1.Warm-up:
- In order to avoid injury, warm up your upper body with dynamic stretches and easy exercises before attempting pull-ups.
2.Maintain proper form :
- At all times during the workout. To finish the repetitions, refrain from swinging or using momentum.
3.Gradual Progression:
- Begin with a manageable degree of difficulty and progressively raise the bar as you gain strength.
4.Rest:
- Give your muscles enough time to recover between sets to avoid overworking them.
5.Spotter:
- If you're unsure about your capabilities, get a trainer or spotter to help you with your pull-up exercises.
6.Listen to Your Body:
- If you feel any pain, stop exercising right once and get advice from a fitness expert or medical practitioner.
6.Pull-Up
Pull-ups are a staple exercise in the fitness industry due to its efficiency in boosting upper body strength and endurance.. Users must lift their own weight by grasping the bar with an overhand grip while performing this bodyweight exercise, which is often performed on a horizontal bar. In addition to other muscle groups like the core, pull-ups engage the back, biceps, and shoulders. 
Whether you are a beginner looking to get fitter or an experienced athlete, mastering the pull-up is a significant accomplishment. Due to how straightforward it is to use, how versatile it is, and how easily it may alter your physique, it is a crucial component of any comprehensive workout regimen.
Benefits:
1.Upper Body Strength:
- Because pull-ups concentrate primarily on the muscles in your back, arms, and shoulders, they are an excellent workout for building upper body strength.
2.Flexibility:
- There are various ways to modify pull-ups to suit different fitness levels, from straightforward ones like aided pull-ups using bands to trickier ones like weighted pull-ups.
3.Functional Strength:
- The muscular mass you gain through pull-ups translates well to daily responsibilities, improving your ability to do tasks that need upper body strength.
4.Core Engagement:
- Your core muscles will be used during pull-ups, improving overall stability.
5.Improved Posture:
- Back pain relief and improved posture are also possible benefits of strengthening the muscles that control posture.
The best way to do a pull-up:
1.Grip:
- Object held in an overhand hold with hands slightly wider than shoulder width apart.
2.Hang:
- While dangling from the bar, completely extend your arms.
3.Pull:
- Lift your body up toward the bar using your back muscles.
4.Reduce:
- Gently bring your body back down.
Safety Guidelines: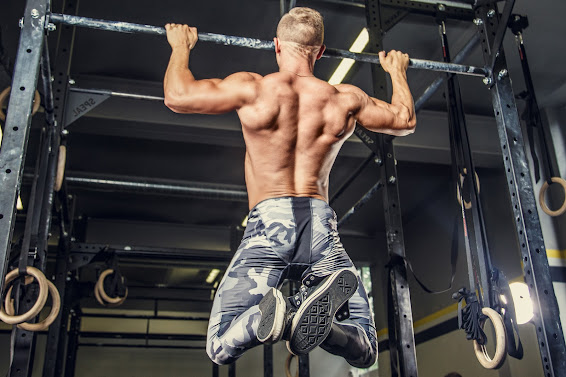

1.Warm-Up:
- Always warm up before attempting pull-ups to prevent injury.
2.Proper Form:
- Maintain proper form throughout the exercise, avoiding excessive swinging or kipping.
3.Start with Assisted Pull-Ups:
- Beginners can start with assisted pull-ups to gradually build strength.
4.Use a Spotter:
- If possible, have a spotter or use a sturdy, adjustable pull-up assist machine.
5.Progress Slowly:
- Increase the intensity gradually by adding reps or weights.
6.Listen to Your Body:
- If you experience pain, stop immediately and seek guidance.
Reps and Sets:
- For beginners, start with 3 sets of 5-8 reps. As you progress, aim for 3-4 sets of 8-12 reps. Rest for 1-2 minutes between sets.
Progression Tips:
Advice for seasoned beginners1.Study the Foundations:
- Start by learning the basics. Before attempting to lift high weights, make sure you are using appropriate form and technique.
- Speak with a certified trainer for tips on how to carry out exercises like rows, pull-ups, and deadlifts with the proper posture and movement patterns.
2.Set definite:
- Attainable fitness objectives. It's critical to have definite, attainable fitness goals.
- Whether your goal is to increase your repetitions, lift heavier weights, or enhance your endurance, having precise goals can help you stay motivated and focused.
3.Progressive Loading:
- The idea of progressive loading is crucial to weightlifting. Start with a weight you are able to maintain for a specific number of reps (often 8–12 for muscle growth).
- Increase the weight gradually as you acclimate and the exercises become easier.
4.Monitor Your Progress:
- To track your improvement, keep a log of your workouts. Record the weights, sets, and repetitions you use for every exercise.
- This will allow you to monitor your development and adjust your regimen as necessary.
5.Change Up Your Routine:
- By adding variation to your routines, you can prevent plateaus. To work different muscle fibers and encourage growth, occasionally switch up the workouts, grips, and angles.
6.Prioritize Rest and Recovery:
- Making progress requires more than just lifting more weight. Both healing and rest are crucial. Make sure you get enough sleep and give your muscles time to rest in between exercises.
Importance of Gradually Increasing Weights or Intensity
- Now that we've discussed the progression tips, let's focus on why gradually increasing weights or intensity during back exercises is crucial:
1.Safety:
- Incremental weight increases reduce the risk of injury. Rushing into heavy weights before your muscles and connective tissues are prepared can lead to strains, sprains, or more severe injuries.
2.Muscle Adaptation:
- Muscles need time to adapt to increased demands. Gradual progression allows your muscles to grow stronger and adapt progressively, leading to more significant gains over time.
3.Plateau Avoidance:
- Increasing intensity ensures you continue to challenge your muscles. Without this progression, your body may plateau, and your progress could stagnate.
4.Improved Confidence:
- Gradual progression boosts your confidence. As you successfully lift heavier weights, you gain a sense of accomplishment and the motivation to continue pushing your limits.
Common Mistakes to Avoid:
For general health and functionality, a strong, healthy back is necessary. However, a lot of people commit simple errors when performing back exercises that might harm themselves and impede their growth. Here are some crucial mistakes to avoid for a safe and productive workout:1.Poor Form:
- The most frequent error made when performing back Exercises is improper form. Make sure your shoulders are down, your core is engaged, and your spine is neutral. Injuries can result from improper form, which can strain the lower back.
2.Utilizing too much weight:
- Might compromise form and raise the possibility of injury. Begin with a manageable weight and increase it gradually as your strength develops.
3.Neglecting the Warm-Up:
- Skipping a proper warm-up might cause injuries by taxing the muscles. To get your back ready for exercise, spend a few minutes doing some light cardio and dynamic stretches.
4.Neglecting Mobility Work:
- Skipping out on mobility and flexibility exercises can restrict your range of motion and impede your growth. Improve your posture and avoid stiffness by using stretches and mobility exercises.
5.Not Changing workouts:
- Continually using the same back Exercises can cause imbalances and plateaus. To guarantee thorough development, incorporate a variety of exercises that concentrate on the back's various muscle groups.
6.Rushing Through Reps:
- Exercising too quickly can make them less effective and put you at risk for injury. Keep your breathing in check and your motions under control.
7.Neglecting Rest and Recovery:
- Rest is a crucial component of muscle recovery and development. Give your back muscles some time to recover because overtraining can cause tiredness and damage.
Nutrition and Rest:
Nutrition and rest are the two main pillars of human health and wellness.. The key elements our bodies require to perform at their best are provided by nutrition, while relaxation and sleep are essential for healing, mental clarity, and general vitality. The need of striking a balance between these two essential facets of a healthy lifestyle is discussed in this introductionBefore Back Exercises:
Fuel Your Body:
- Proper nutrition provides the energy needed for an effective workout. Consume a balanced meal 1-2 hours before exercising, focusing on carbohydrates for energy and protein for muscle repair.
Hydration:
- Staying well-hydrated is key to preventing muscle cramps and maintaining overall performance.
Supplements:
- Consider adding supplements like branched-chain amino acids (BCAAs) or creatine to enhance muscle recovery and endurance.
Following back exercises:
- Consuming protein will help your body recover from exercise and develop muscle. Within 1-2 hours, try to have a protein-rich meal or smoothie.
- Restock your glycogen stores with carbohydrates to promote recovery and stave off weariness.
Rest and sleep:
- For muscles to recuperate and expand, they need enough rest and sleep. Aim for 7-9 hours of good sleep each night.
- Continue drinking water to flush out toxins and avoid becoming stiff after an exercise session.
Give yourself a real pat on the back as you finish off Week 2 of your back training program! You've made progress in building a more robust and healthy back. Hold onto those moves that are appropriate for beginners, emphasizing form and consistency. Recall that progress, not perfection, is what matters. Pay attention to your body, acknowledge little victories, and persevere. Your long-term support will come from the foundation you're currently laying. Thus, cheers to the health of your back! Keep up the good work, and Week 3 is full of growth prospects!
Post a Comment
0Comments